If you are looking for a secure TrafficMonitor remote monitoring plugin to track the hardware health of remote servers, home labs, or virtual machines, this architectural breakdown is for you. Monitoring distributed infrastructure usually requires heavy third-party agents or constant cloud reliance. However, this open-source C++ alternative brings critical system telemetry straight to your taskbar.
RemoteMonitor is a high-performance, cryptographically secure Windows DLL extension engineered following strict SOLID design principles. It serves as a dedicated TrafficMonitor remote monitoring plugin, giving you instant access to remote CPU, RAM, GPU, storage, network speeds, and temperatures with a near-zero performance footprint.
⚡ Hardware Metrics Tracked by the TrafficMonitor Remote Monitoring Plugin
RemoteMonitor pulls real-time hardware data from remote machines and organizes them into cohesive taskbar display items:
- Network Multiplexing: Monitor granular Upload and Download speeds simultaneously.
- Processor Diagnostics: Track overall CPU Usage percentage, localized core Frequencies (MHz), and Core Temperatures (°C).
- Memory Analytics: View raw RAM Utilization, alongside exact Used vs. Total physical memory bytes translated into Gigabytes.
- Dedicated Graphics: Keep tabs on GPU Load and thermal profiles for remote rendering or compute nodes.
- Storage Integrity: Monitor Hard Disk Drive (HDD/SSD) space utilization and active drive temperatures.
For more AI-driven automation on your workstation, you can also check out our Unreal Engine Gemini AI Plugin integration guide.
⚙️ Understanding the 3 Core Operational Network Modes
To implement an effective network strategy across complex topology layers, firewalls, and ISP limitations, this TrafficMonitor remote monitoring plugin splits workloads into dedicated Client and Server execution profiles via a thread-safe UDP network engine:
1. Local Node Configuration (Server Role)
When sharing this machine’s local metrics with another monitoring workstation, the plugin exposes three standalone states:
- Disabled Mode: The network engine halts local tracking loops completely and stops transmitting any outbound telemetry bytes.
- Passive Pull Mode (R3DQ): The local system binds onto a defined UDP port and waits silently. When an external monitoring client fires an authorized query request, the server cryptographically validates the identity and replies with a secure hardware metrics packet. Note: Accessing a Passive Pull node outside your local area network (LAN) requires setting up proper Port Forwarding rules on your gateway router.
- Active Push Mode (R3DM): The node automatically takes control as an active outbound streamer. It packages and encrypts local hardware metrics at synchronized intervals, transmitting them directly to a targeted remote IP and port. This mode completely circumvents deep NAT routing blockages and strict firewalls without requiring inbound open ports.
2. Remote Server Tracking Configuration (Client Role)
When configuring your primary monitoring workstation to capture and aggregate metrics from other network nodes, you can assign target machines into two operational tracking modes:
- Fetch Mode: Your workstation actively initiates outbound cryptographic queries at regular intervals, pinging remote listeners configured in Passive Pull mode and tracking response states.
- Listen Mode: Your workstation binds local passive sockets onto designated ports, standing by to ingest incoming stream payloads pushed automatically by remote nodes operating in Active Push mode.
🛡️ Production-Grade Security Architecture
Exposing hardware architecture and performance metrics over public networks can introduce massive security liabilities. RemoteMonitor treats security as a core architectural layer rather than an afterthought:
- Authenticated Encryption: All transient network packets are encrypted in-place utilizing the industry-standard AES-256-GCM cipher suite through native Windows CNG (Cryptography Next Generation) system APIs.
- High-Entropy Key Derivation: Pre-shared security keys are never processed raw. The plugin forces passwords through a rigorous PBKDF2 key derivation pipeline using HMAC-SHA256 backed by 100,000 iterations and static application salts.
- Anti-Replay Protections: To neutralize malicious packet-capture injection attacks, every block maps an absolute UTC epoch timestamp and a strict monotonic sequence counter. If a packet slips past a tight 30-second sliding-time tolerance window, or if an identical sequence ID repeats, the network engine drops the payload instantly.
- Strict Whitelisting: Passive listener instances can be hard-locked to discard packet overhead originating from any IP address not explicitly defined in an authorized comma-separated access control list.
🚀 Deployment & Interactive Options
The plugin hooks natively into TrafficMonitor’s internal lifecycle, presenting an intuitive Win32 user interface for multi-node additions alongside a unified configuration backend.
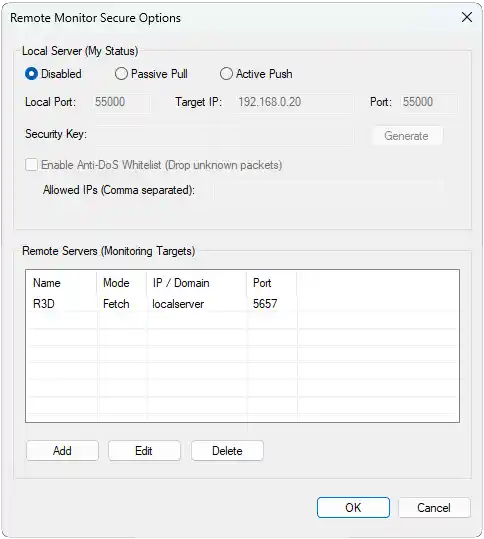
Installation Steps:
- Download the stable compiled plugin package from the GitHub Releases tier.
- Extract the zip package to reveal
RemoteMonitor.dlland a templateRemoteMonitor.ini. - Ensure TrafficMonitor is fully shutdown, then drop
RemoteMonitor.dlldirectly into yourplugins/folder. - Relaunch the app, right-click the taskbar dashboard, select Plugin Options -> Remote Monitor, and configure your server network boundaries.
🔧 Manual INI File Configuration
For headless nodes or network administrators, you can configure your server profiles manually by creating or editing a RemoteMonitor.ini file directly inside the program directory:
[Settings]
ServerMode=1
LocalPort=55000
TargetIP=192.168.0.10
TargetPort=55000
SecurityKey=y$R8v#X!mK9@P2&qW4_zT7*bN1%jE5=a
EnableWhitelist=1
WhitelistIPs=192.168.0.20, 192.168.0.30

ServerCount=1

[Server_0]
ID=R3D_SRV_01
Name=Home Server
Mode=0
IP=192.168.0.10
Port=55000
SecurityKey=y$R8v#X!mK9@P2&qW4_zT7*bN1%jE5=a
❓ Troubleshooting & Technical FAQ
A: This occurs when incoming packet data fails validation or decryption. Verify that:
1. The assigned firewall ports are explicitly opened for UDP traffic on both systems.
2. For WAN links using Passive Pull, ensure you have configured correct Port Forwarding rules pointing to the target machine’s local IP inside your gateway router configuration.
3. The configured SecurityKey strings match exactly byte-for-byte.
4. Both system times are synchronized via NTP (as a clock drift exceeding 30 seconds triggers the anti-replay protection block).
A: Absolutely. By deploying unique combinations of Fetch and Listen profiles alongside high-entropy random keys, you can securely stream encrypted telemetries across distributed cloud regions or residential connection loops safely.